
# Risk assessment
# File management
# Create a new risk assessment
You have two options for creating a new risk assessment:
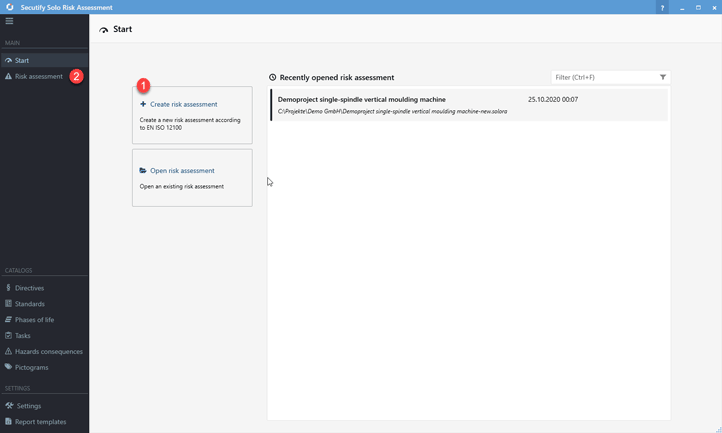
# Button Create risk assessment (1)
Go to Main Menu > Start and click on the button Create risk assessment to open the dialog Create New Risk Assessment.
# Main menu Risk assessment (2)
If no risk assessment has been opened yet, you can alternatively click directly on the menu item Risk Assessment in the Main Menu to open the Create New Risk Assessment dialog.
# Record information for risk assessment
Enter the information required to create the new risk assessment. Fields marked with an asterisk (*) are mandatory.
- Project: Information on the associated project
- Responsible: Name of the person responsible for preparing the risk assessment
- Language: Documentation language
- Product: Information on the product for which the risk assessment is being prepared.
- Save as: Select a file path here and enter the file name under which the risk assessment is to be saved.
Click on the Create button  to create the risk assessment.
By clicking the Cancel button you can cancel the operation and leave the creation dialog.
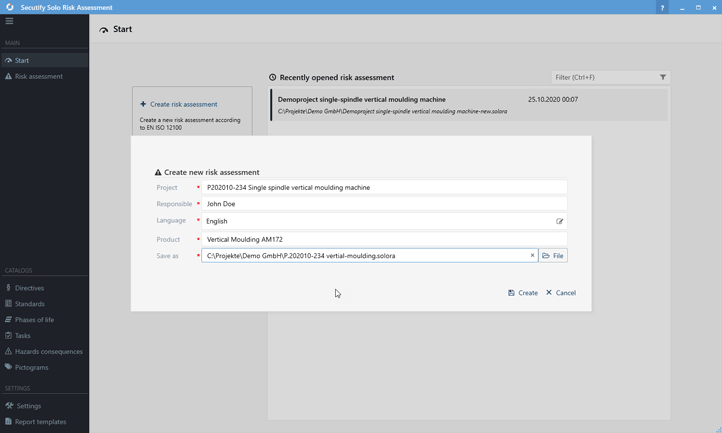
The newly created risk assessment is added to the list of Recently opened risk assessment so that you can easily access it later on.
# Open risk assessment
Existing risk assessments can be opened in one of the following ways:
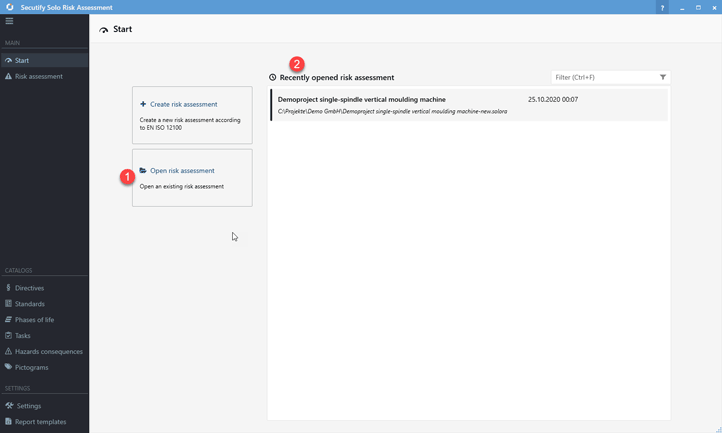
# Open risk assessment button (1)
Open Secutify Solo and click the Open Risk Assessment button on the Start page. The Open file dialog will then open, allowing you to select and open the desired risk assessment file (*.solora).
# Recently opened risk assessment (2)
In the list of Recently Opened Risk Assessments you will find the most recently used files. When you open or create a risk assessment, it is automatically added to the list. Select the risk assessment to be opened from the list and click the Open risk assessment button or double-click to open the file.
# Directly in the Windows file explorer
Risk assessment files with the file extension .solora can be opened by double-click.
# Command line parameters
To start Secutify Solo from the command line, the following option is available:
SoloRA.exe << Path to risk assessment file >>
Available start parameters
| Parameters | Description |
|---|---|
| << Path to risk assessment file >> | To open the specified risk assessment |
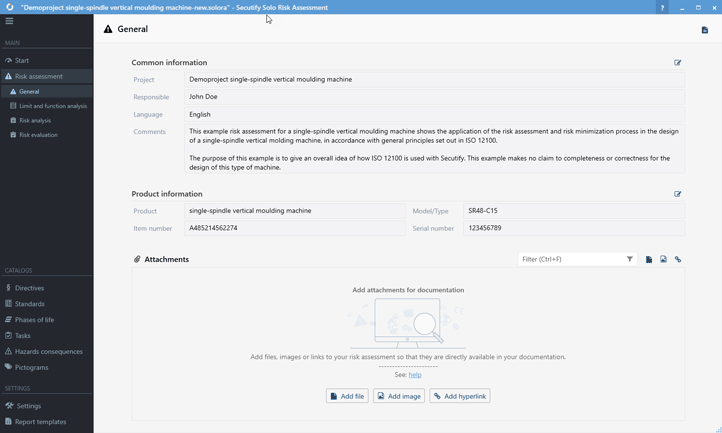
# General
General information on risk assessment is managed under the menu item Risk Assessment > General.
On the page Risk_assessment > General you enter information about the project, the person responsible and information about the product for which you are performing the risk assessment. Here you determine in which language you want to create the documentation and can manage attachments that you want to include with the risk assessment in order to manage them as part of the documentation.
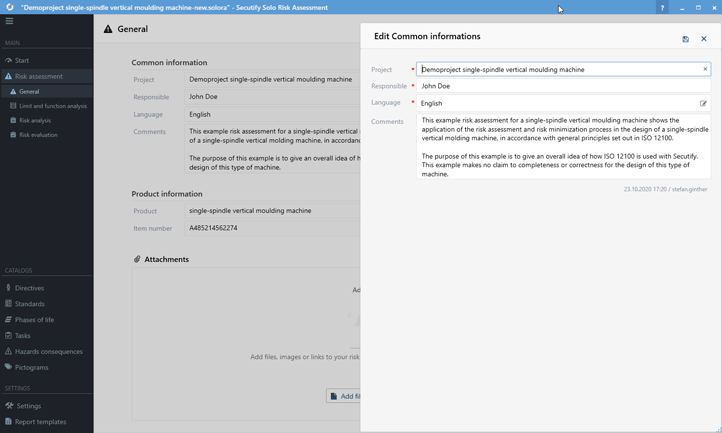
# Common Information
In this section you can enter information about the project, the responsible person for the risk assessment, the language in which the documentation is created and remarks.
To modify, click on the edit button
 . This opens the Edit flyout.
Save your changes with Save
or leave the flyout without saving your changes with Cancel  .
.
Note:
Secutify Solo supports atomic modification operations, so you can never lose extensive changes without intermediate storage. Every modification in the edit flyout is saved in the file by clicking Save and can therefore no longer be lost.
# Product information
In this section you can enter details about the product, model/type or the part/serial number.
to modify, click on the edit button
. This opens the Edit flyout.Save your changes with Save
or leave the flyout without saving your changes with Cancel .
# Attachments
In the Attachments section you have the option to include important documents within the risk assessment or create hyperlinks. If you add files or pictures, these will be embedded in the risk assessment and thus become part of the documentation.
Add a hyperlink to link to external documents or websites.
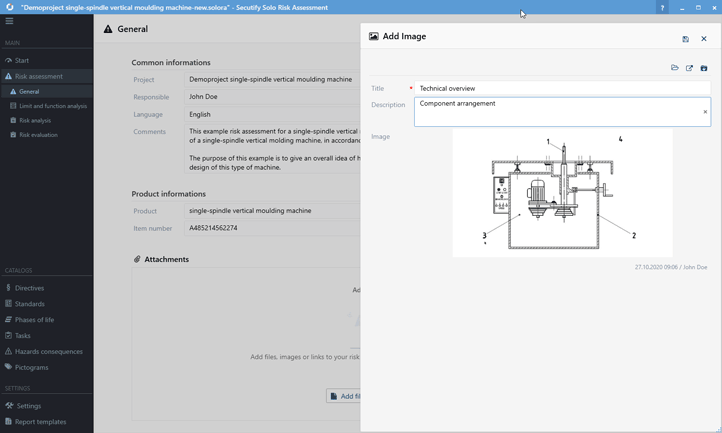
# Add file/image
- depending on the type of document you want to add, select the option Add File
 or Add Image
  .
. - click on the button Select file/image
 in the Edit flyout and select the desired file in the file dialog and add it with Open.
 - the file name is automatically transferred to the Name field. You can assign the name freely, choose a meaningful name.
. In the field Description you can enter additional information about the file. - click on Save to accept the data
# Open file/image
Added files or images can be opened in the corresponding external application.
- click the Open button

- the file is opened in the associated external application.
# Export file/image
The files stored in the risk assessment can be exported for further processing independently. Proceed as follows:
- Click on Edit to open the edit flyout
- Select Export file

- In the Save file dialog select the location and click on Save
- Leave the flyout with Cancel
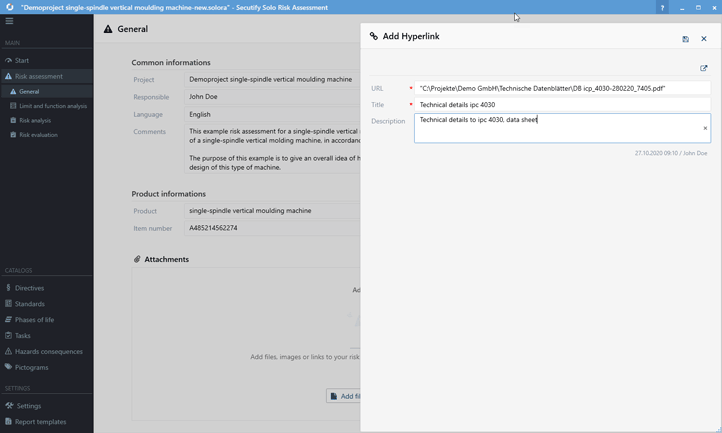
# Add Link
To link external documents, hyperlinks can be added. You can add links for files that are located locally on your computer or on a network drive. You also have the option to add links to websites.
- to add a hyperlink click on the button add hyperlink

- add in the field URL
a) the file path (including the file name),
b) or the URL as it appears in the address field of your browser,
. - in the title field you can enter a meaningful name for the link. Under Description you can enter additional information.
- click on Save to accept the data.
# Open hyperlink
You can open stored hyperlinks in the corresponding external application.
- Click on the Open button
- The link is opened in the assigned external application.
# Delete attachments
To delete added files, images or hyperlinks, proceed as follows:
- In the Attachments list, click on the delete button
 for the record that you want to delete
 - Confirm the security question "Do you want to delete the data irrevocably?" with Delete
# Limit and function analysis
You can enter the functional description and define the limits of the machine in the Limit & Function Analysis.
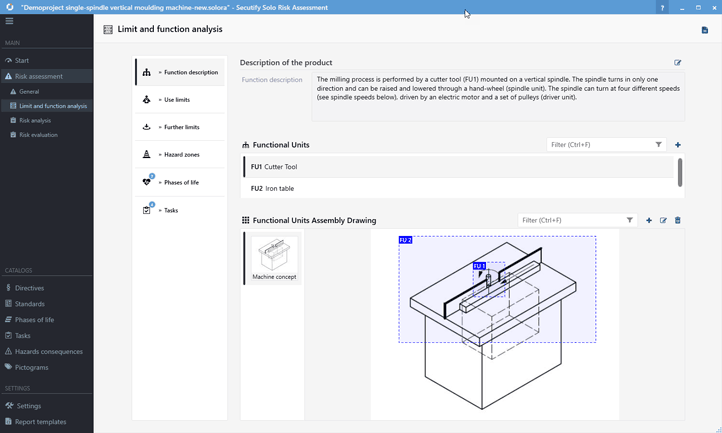
# Functional description
On the Function Description page, you can describe the functionality of the machine and the interaction of the machine components. To support the textual description, you can add overview drawings of the machine. Additionally, you can enter a list of functional units to draw them graphically into the overview drawing.
# Description of the product
To enter the functional description:
- Open the edit flyout via the button Edit
- Enter the functional description
- Click on Save to accept the data.
# Functional units
Functional units can be logical or physical units of the machine or plant, which you refer to in the textual description and which you want to draw into the overview drawings, if necessary.
- Click on add functional unit
 to enter a new functional unit.
 - Enter a description for the functional unit and optionally enter a description for it.
- Click on Save to transfer the data
To change an entry, click on Edit in the relevant data set.
To remove an entry, click on delete in the respective record and confirm the following security prompt.
# Overview drawing functional units
You can add overview drawings for easier understanding of the function description. The recorded functional units can be drawn graphically into the overview drawing. This can contribute to an easier understanding of the textual description.
# Add drawing
- Click on Add to create a new drawing The Edit flyout opens.
- Go to select image and select the desired file in the file dialog. Add the image by clicking on Open.
- The file name is automatically transferred to the field Description. You can change the name freely.
- Click on Save to accept the data and return to the standard view.
# Insert functional unit into the drawing
- Select the relevant drawing from the list of overview drawings and click on Edit . The Edit flyout opens.
- Click the Select functional unit button to open the selection dialog. Select the functional unit to be added and click on Apply

. You have the possibility to insert several functional units, you can also insert the same functional unit several times. - The inserted functional unit is marked by its ID and highlighted in color. You can freely move the area on the drawing and adjust its size using the anchor points at the corners.
- Accept the changes with Save to return to the standard view.
# Remove functional unit from drawing
- Select the relevant drawing from the list of overview drawings and click on Edit . The Edit flyout opens.
- Select the function unit on the drawing that you want to remove. The anchor points are displayed for the selected function unit.
- Click the button Remove functional unit
 to remove the selected area.
 - Accept the changes with Save to return to the standard view.
# Use limits
On the Use limits page you enter the intended use of the machinery and the reasonably foreseeable misuse. Intended areas of use such as industry, trade or household can be entered in the Application area field.
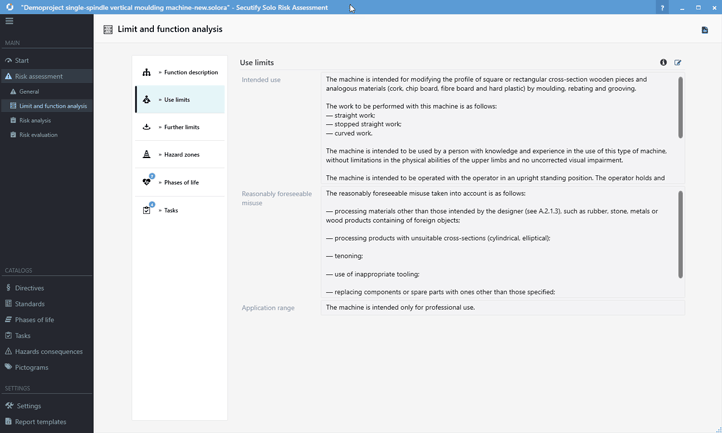
- Click on Edit . The Edit flyout opens.
- Enter the values for the machine in the corresponding fields.
- Accept the changes with Save to return to the standard view.
# Further limits
Enter the information:
- Space limits
- Time limits
- Other limits.
- Click on Edit . The Edit flyout opens.
- Enter the specifications for the machine limits in the corresponding fields. If you move the mouse pointer over the direct help icon
 , you will receive additional information to assist you in entering the data.
 - accept the changes with Save to return to the standard view.
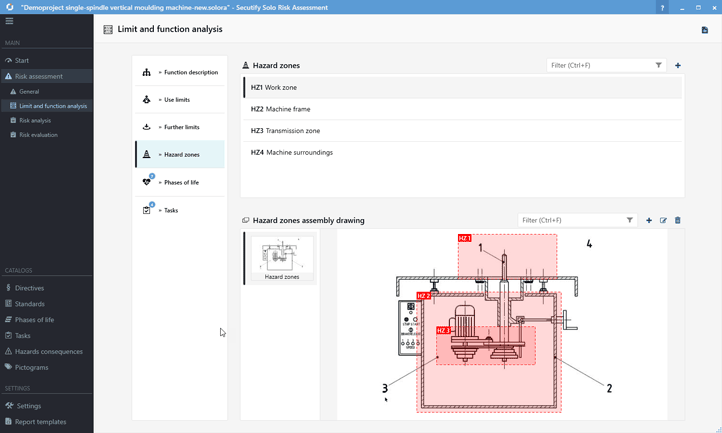
# Hazard zones
A hazard zone is any area in and/or around a machinery in which a person may be exposed to a hazard.
On this page, record all zones of the machine from which a potential hazard can arise. The hazard zones recorded here are assigned to the identified hazards in the step of the risk analysis.
# Add hazard zone
- In the Hazard zone list, click Add Hazard zone . The Edit flyout opens.
- Give the new hazard zone a meaningful name and optionally add a description.
- Accept the changes with Save to return to the standard view.
# Change hazard zone
- Select the appropriate hazard zone and click on Edit . The Edit flyout opens.
- Make the appropriate changes.
- Accept the changes with Save to return to the standard view.
# Delete hazard zone
Select the appropriate hazard zone in the list.
2. Click the delete button
3. Confirm the security question "Do you want to delete the data irrevocably?" with Delete
# Overview drawing Hazard zones
The position of the hazard zones on the machine can also be recorded graphically. Add a picture and draw the danger area in red.
# Add drawing
- Click on Add to create a new drawing The Edit flyout opens.
- Go to select image and select the desired file in the file dialog. Add the image by clicking on Open.
- The file name is automatically transferred to the field Description. You can change the name freely.
- Click on Save to accept the data and return to the standard view.
# Add a hazard zone to the drawing
- Select the relevant drawing from the list of overview drawings and click on Edit . The Edit flyout opens.
- Click the Select functional unit button to open the selection dialog. Select the hazard zone to be added and click on Apply
. You have the possibility to insert several hazard areas, you can also insert the same hazard area several times. - The inserted hazard zone is marked by the ID and highlighted in color. You can move the area freely on the drawing and adjust its size using the anchor points at the corners.
- Accept the changes with Save to return to the standard view.
# Remove marked hazard zones from drawing
- Select the relevant drawing from the list of overview drawings and click on Edit . The Edit flyout opens.
- Select the hazard zone on the drawing that you want to remove. The anchor points are displayed for the selected hazard zone.
- Click the _Remove Hazard zone _ button to remove the selected area.
- Accept the changes with Save to return to the standard view.
# Phases of life
Under phases of life you can enter all phases relevant to the life cycle of the machine.
The specification of the phases of life is an important pre-requisite for the risk analysis. In the risk analysis, the phases of life defined here are assigned to the identified hazards. The phases of life stored in the Phases of life catalogs are available for selection to ensure consistent use of the terms.
# Add a phase of life
- In the Phases of Life list, click on Add Life Phase . The Edit flyout opens.
- Give the new phase of life a meaningful name and optionally add a description.
- Accept the changes with Save to return to the standard view.
# Delete phases of life
- Select the appropriate phase of life in the list.
- Click the delete button
- Confirm the security question "Do you want to delete the data irrevocably?" with Delete
# Tasks (activities)
Under Tasks (Activities) you enter all tasks that have to be performed during the life cycle of the machine.
The specification of the tasks (activities) to be performed is an important preparation for the risk analysis. In the risk analysis, the tasks defined here are assigned to the identified hazards. The tasks stored in the tasks catalogs are available for selection in order to enable consistent use of the terms
# Add task
- In the list Tasks click on add task . The Edit flyout opens.
- Give the new task a meaningful name and optionally add a description.
- Accept the changes with Save to return to the standard view.
# Delete task
- Select the corresponding task in the list
- Click the delete button
- Confirm the security question "Do you want to delete the data irrevocably?" with Delete
# Risk Analysis
Once the limits of the machine have been defined, the most important step in any risk assessment of a machine is the systematic identification of reasonably foreseeable hazards (permanent hazards and those that may occur unexpectedly), hazardous situations and/or hazardous events at all stages of the machine's life.
In the process step of the Risk analysis you systematically record the hazards present on the machine or system and carry out a risk assessment. For this purpose, you can use the hazard areas and tasks identified in the limit analysis step.
In Secutify you have the possibility to record similar hazards in combination. This keeps the risk assessment lean and clear.
What is the advantage of a combined hazard recording?
Similar hazards can occur on a machine at different locations, in several phases of life and when performing different tasks. In many cases, these hazards can be sufficiently reduced uniformly by applying a specific combination of protective measures.
In such a scenario, it is advisable not to record all the hazards individually, but to create an overall hazard specification, which can then be solved uniformly in the step of risk assessment and risk reduction.
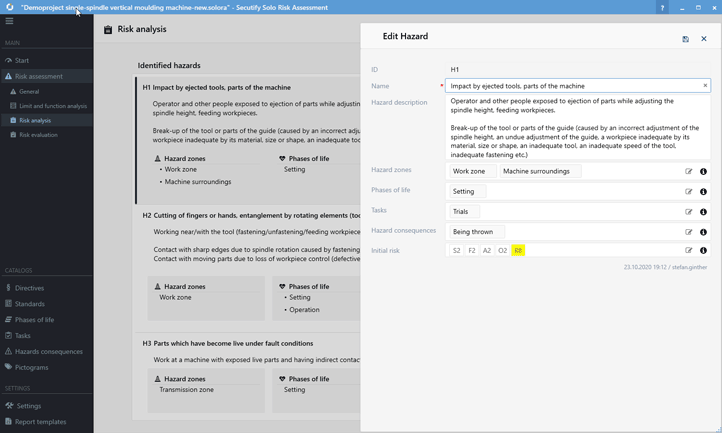
# Identified hazards
To record, change or delete a hazard, proceed as follows:
# Add a hazard
- Click on add hazard to create a new hazard. The Edit flyout opens.
- Enter a meaningful description for the hazard and enter the hazard description (hazard situation, hazard event)
- Select the hazard zones where the hazard occurs.
Note: Hazard zones are defined in the step Limit & Functional Analysis - Select the tasks (activities) where the hazard occurs.
Note: The tasks selectable are defined in the step Limit & Functional Analysis. - Carry out the risk evaluation to determine the inital risk associated with the hazard.
Further information on the risk graph can be found in the section Risk assessment using risk graph - Accept the changes with Save to return to the standard view.
# Edit hazard
- Select the corresponding hazard and click on Edit . The edit flyout will open.
- Make the appropriate changes.
- Accept the changes with Save to return to the standard view.
# Delete hazard
- Select the corresponding hazard in the list
- Click the delete button
- Confirm the security question "Do you want to delete the data irrevocably?" with Delete
Note
A hazard can only be deleted if no risk reduction measures have been entered in the risk evaluation step.
# Risk evaluation
Following the risk estimation made in the risk analysis, a risk evaluation must be carried out. If a risk reduction is necessary, suitable protective measures must be selected and applied.
On the initial page of the risk evaluation you will see an overview of all identified hazards. In addition, you can see whether the risk has already been assessed as "sufficiently reduced" or which assessment has been made with regard to the remaining residual risk.
Open the detail view by double-clicking on Hazard or click on the Drill-Down  button on the far right.
The detail view contains detailed information and has the following structure:
1 Header. ID and name of the currently opened hazard. Breadcrumb navigation for easy navigation through the individual drill-down levels.
2 Risk analysis. Designation and estimation of the initial risk of the hazard. The Analysis Details section can be expanded to view the complete data of the hazard. The risk analysis data is "read-only" in this view, it can be changed in the process step Risk Analysis.
3 **Protective measures for risk reduction ** Enter here the required protective measures according to the 3-step procedure as well as information on remaining residual risks.
4 **In this section, you perform the risk evaluation, taking into account the protective measures taken, to determine the residual risk. Furthermore, you make the assessment of risk reduction, i.e. the assessment of whether the risk can be classified as sufficiently reduced.
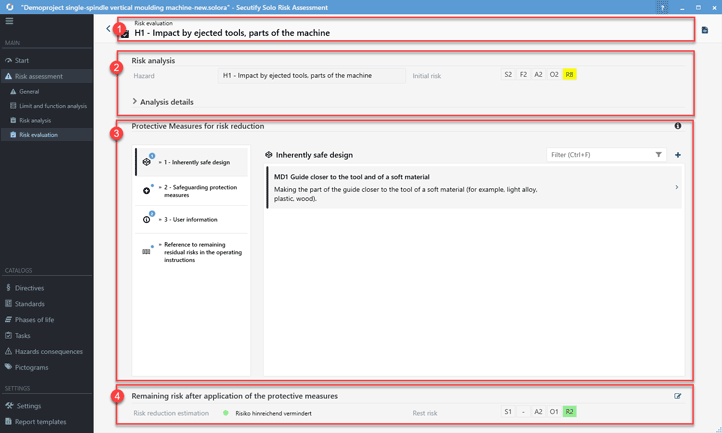
# Protective measures for risk reduction
The protective measures required to reduce the risk can be applied here according to the 3-step procedure
- inherently safe construction
- technical protective measures and supplementary protective measures
- user information
Indications of residual risks that remain despite the application of protective measures can be recorded in item 4.
# Add protection measure
- Select the type of protection you want to add in the tab on the left
- Click on add protective measure to enter a new protective measure for risk reduction. The Create dialog opens.
- Enter a meaningful name for the protective measure and enter a description.
. 3.1 If the protective function depends on a control, activate the Control required option button to subsequently record the performance level. - Click on create
 to create the protective measure.
 - (Optional) In the Control section, click .
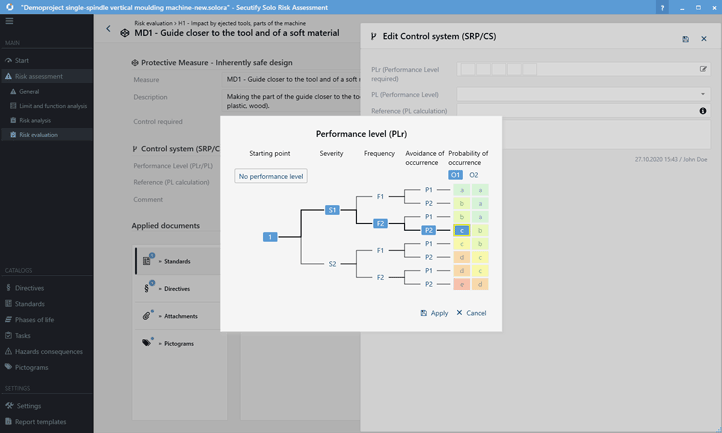
5.1 Open the risk graph according to EN ISO 13849-1 to determine the required performance level (PLr). Click on Apply to confirm the selection.
5.2 If you have already designed the safety function and calculated the actual achieved Performance-Level (PL) you can enter this in the selection field. 5.3 In the field Reference (PL calculation) you can enter a reference to the calculation file (e.g. your SISTEMA project). 5.4 In addition, you can enter annotations.
5.5 Apply the changes with Save to return to the previous view. - in the Applied documents section, you can enter the documents used to specify the protection measure.
. 6.1 In the Standards section, you can store the standards relevant for the protective measure. The standards can be selected from the lists of the standards catalogs.
Under Sections the applied sections of the standard can also be entered. Note: If you have stored the PDF document associated with the standard in the standards catalog, you can open it here directly.
6.2 In the Directives section you can record the directives and the sections of the health and safety requirements (GSA) that you comply with.
6.3 In the Attachments section you can attach files or images, or create links to external documents.
6.4 In the Pictograms section, you can enter security signs from the pictogram catalogs. 6.5 Apply the changes with Save to return to the previous view. - When you have finished capturing the protection function, you can navigate back to the detailed view of the hazard using back
 navigation on the left of the header bar.
# Add note on remaining residual risks
Following risk reduction through protective measures, they can record indications of remaining residual risks.
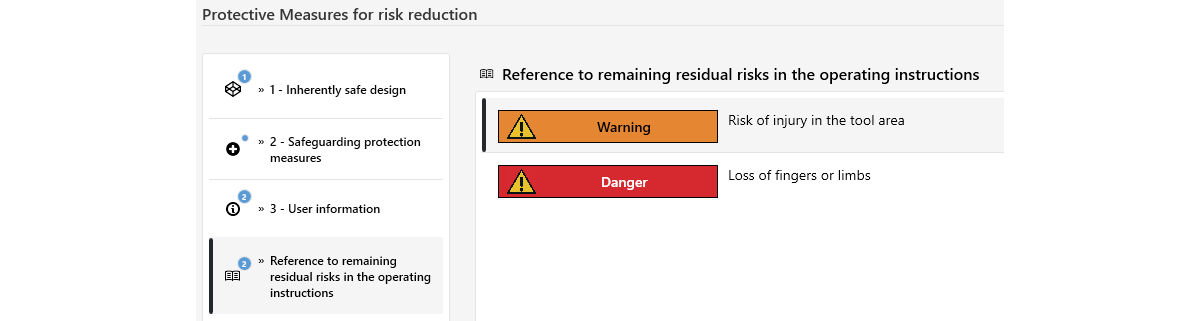
1 In the tab on the left, select "Notice of residual risks remaining in the operating manual".
2. Click on add note to enter a new protective measure for risk reduction. The Edit flyout opens.
3. select a category for the note: "Danger", "Warning", "Caution", "Note
4. in the Description field, enter a note about the remaining risk.
5. accept the changes with Save to return to the previous view.
# Modify protective measure/notice
- Select the tab that contains the protection measure or the reference to residual risks
- Click on Edit for the relevant record. The Edit flyout opens.
- Make the appropriate changes.
- Accept the changes with Save to return to the standard view.
# Delete protective measure/notice
- Select the tab where the protection measure or the note on residual risks is located.
- Click on the delete button for the relevant record
- Confirm the security question "Do you want to delete the data irrevocably?" with Delete
# Risk estimation
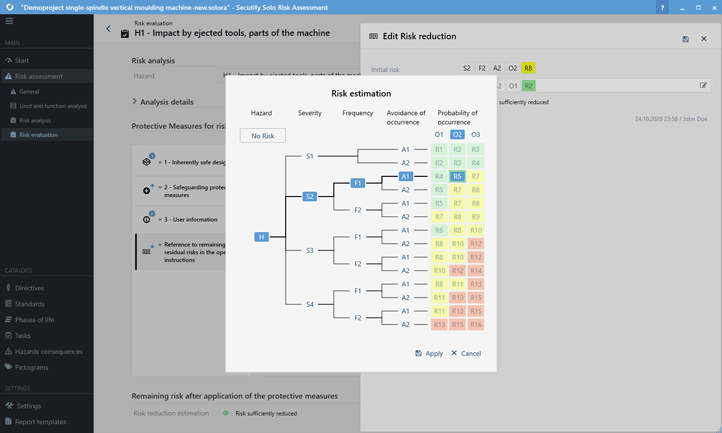
# Create estimation
- Click on Edit to open the edit flyout
- The initial risk estimated during the risk analysis is displayed here directly as a reference point.
- Open the risk graph to make the estimation for the residual risk. Further information on the risk graph can be found in the section Risk assessment using the risk graph
- If the risk is considered sufficiently reduced, you can set the corresponding status under Risk Reduction Estimation.
- Accept the changes with Save to return to the standard view.
# Change estimation
- Click on Edit . The Edit flyout opens.
- To change the estimation for the residual risk, open the risk graph.
. 2.1 The selection made (S, F, A, O) - restriction to row or column level - can be cancelled by clicking on the buttons marked in blue. By clicking on the start point , you can reset the entire assessment.
2.2 Click on to confirm the selection. - Click the option button to change the risk reduction assessment.
- Accept the changes with Save to return to the standard view.
# Risk assessment report
With Secutify you can create a clear report for your risk assessment. You can adjust the scope of the report, for example, if you only want to output individual sections. The settings you make can be saved as a template for the risk assessment. You can then select the desired template when you next create the report.

# Create report
Proceed as follows to create a report for the risk assessment.
- Open the Risk Assessment with Secutify Navigate in the main menu to the menu item Risk assessment or a sub-item thereof.
- In the header the button Create report
 is displayed
 - if you have created Report Templates, you can select the desired template in the Select Report Template dialog and click the button:
. a) Being able to open Create Report,
b) Save report can be output directly to the file system.
If you have not yet created any templates, the report for the risk assessment is opened directly.
# Set logo
You have the option of outputting a graphic file on the cover sheet of the risk assessment. This could be your company logo or a project logo, for example. The supported file formats are: PNG, JPG, BMP, GIF
Please use the following settings for the graphic file:
- width: 1008 pixels
- Height: 300 pixels
- Resolution: 300 pixels/inch
- Background: white (graphics with transparent background are not supported)
- Navigate in the main menu, in the section Settings to the menu item Settings.
- In the section Report settings click on Edit . The Edit flyout opens.
- Click on the Select logo button in the toolbar and select the desired file in the file dialog Accept the file with Open. The image is displayed in the Logo area.
Note
The selected file may not be displayed completely in this view. If you have used the specified pixel values to create the graphic, it should be displayed correctly in the PDF document.
- Apply the changes with Save to return to the standard view.
# Create report template
You have the possibility to customize the sections output in the report to your requirements. To do this, you can create report templates derived from system reports.
- Navigate in the main menu, in the section Settings to the menu item Report templates.
- Click on add report template to create a new template The Edit flyout opens.
- Select the system report from which you want to create a customized template
- Assign a template name.
- Select the sections of the report you want to output
- Apply the changes with Save to return to the standard view.